
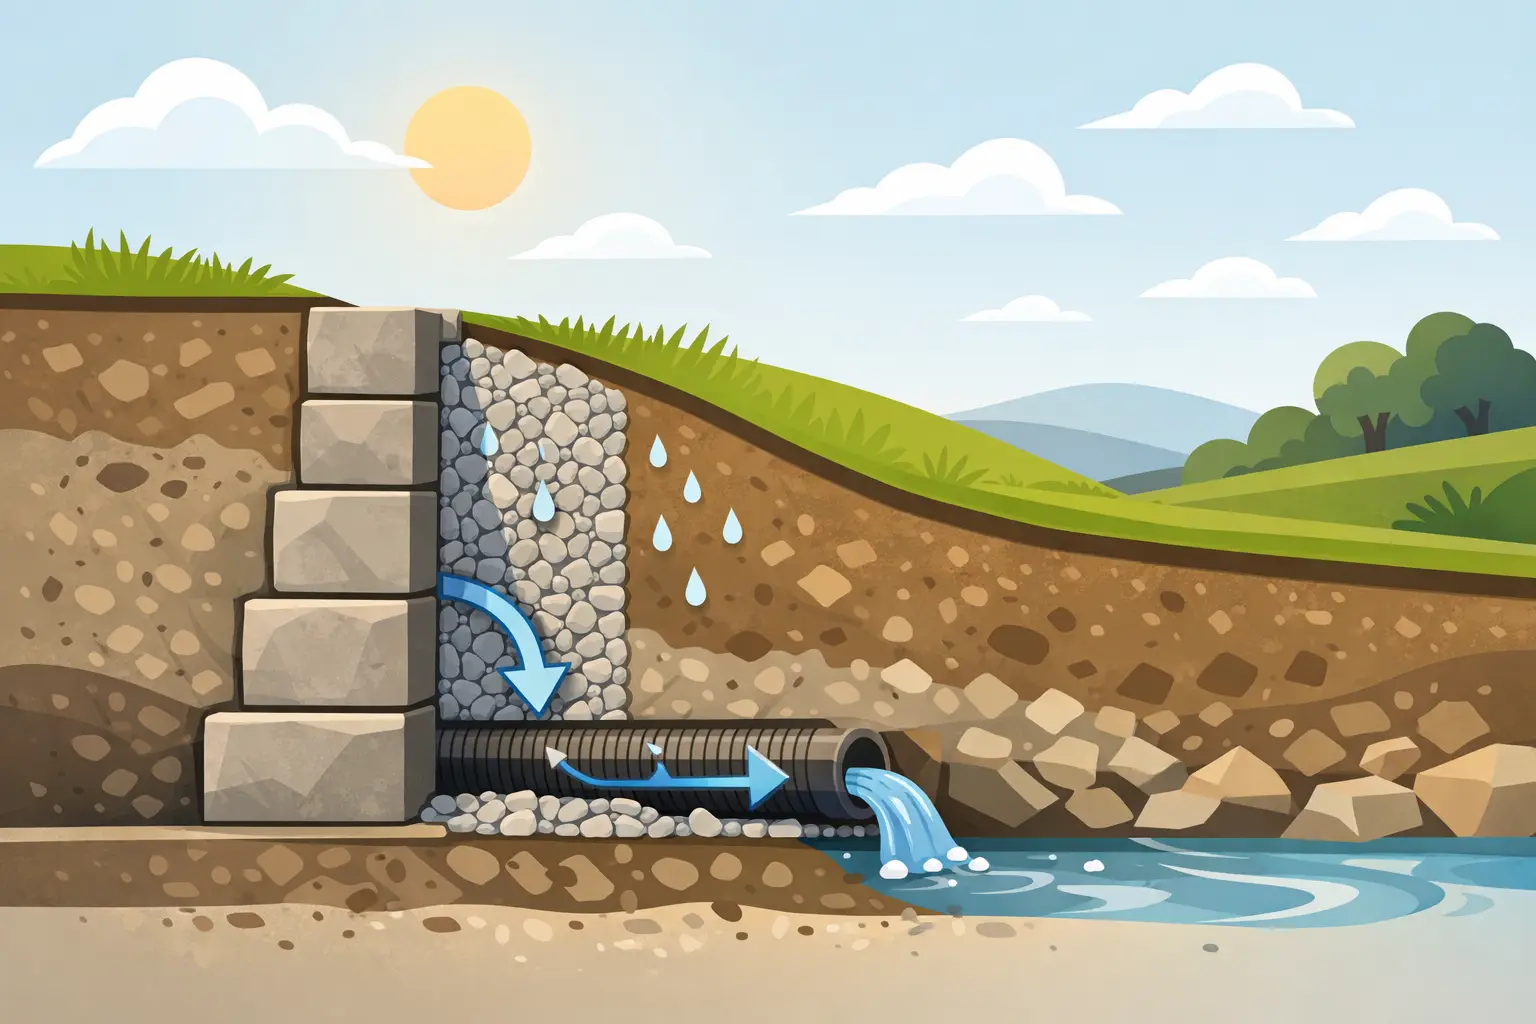
Water is the main reason a retaining wall that looked great on day one can start leaning, cracking or staining a few wet seasons later. Retaining wall drainage basics come down to one practical job: give water a clear path away from the soil behind the wall before pressure builds up.
For Hawke’s Bay properties, this matters after heavy rain, on sloping sites and in gardens with clay-heavy ground. A well-built wall does more than hold back soil. It protects usable outdoor space, garden beds, paths and nearby structures. Drainage is what helps it keep doing that job.
Why water puts retaining walls under pressure
Soil holds water after rain or irrigation. As that soil becomes saturated, it gets heavier and pushes harder against the back of the retaining wall. Water can also create hydrostatic pressure, which is force caused by trapped water pressing directly against the structure.
A wall may cope with ordinary soil pressure but struggle when that soil is saturated. The warning signs are often gradual: a wall starts to bow, timber posts move out of line, blocks separate, or water appears where it should not. White mineral marks, muddy runoff and consistently soggy garden beds can also point to poor drainage.
This is why a wall should never be treated as just a visual edging feature. Even a modest garden wall needs the right preparation if it is retaining ground that gets wet.
Retaining wall drainage basics: the parts that work together
Good drainage is not one product or one hole in the wall. It is a system made up of free-draining material, a drainage pipe, separation fabric and a planned outlet. Surface water management completes the job.
Free-draining gravel behind the wall
The backfill immediately behind a retaining wall should generally be clean drainage aggregate rather than ordinary excavated soil. Gravel leaves gaps for water to move through, so it does not sit trapped against the wall.
The width of this drainage zone depends on the wall design, site conditions and wall height. For a low garden wall, the drainage layer may be relatively straightforward. For taller walls, steep slopes or walls supporting driveways and buildings, the design needs more care and may require engineering advice.
Do not use fine soil, clay or mixed spoil as drainage backfill simply because it is already on site. It compacts tightly and can block water movement. Saving a little on material at this stage can lead to expensive repairs later.
Agricultural pipe at the base
A perforated agricultural drain pipe, commonly called ag pipe, is usually installed along the base behind the wall. It collects water travelling down through the gravel and carries it to a safe discharge point.
The pipe needs a consistent fall so water can move rather than pool. It should sit within drainage aggregate, not directly in soil. On many sites, filter sock around the pipe and geotextile fabric around the gravel zone help keep silt from entering and clogging the system.
The outlet is just as critical as the pipe itself. A drain that has nowhere suitable to discharge will not solve the problem. Depending on the site, water may be directed to an approved stormwater connection, a suitable lower area of the property or another designed drainage point. The discharge location must not create flooding, erosion or nuisance runoff for neighbouring properties.
Geotextile fabric to keep soil out
Geotextile fabric separates the drainage gravel from surrounding soil. It lets water pass through while helping to stop fine particles migrating into the aggregate.
Without separation, fine soil can gradually fill the gaps in the gravel. The drainage layer then behaves more like solid ground, and water starts building up behind the wall again. The fabric should be installed neatly and continuously around the drainage zone where the wall design calls for it, with overlaps that prevent soil from finding a path through.
Weep holes where suitable
Some masonry and concrete retaining walls use weep holes through the face of the wall. These allow water to escape directly rather than remain trapped behind it.
Weep holes can be effective, but they are not a substitute for gravel and a base drain. They need to remain clear, and they need to discharge somewhere sensible. On a wall beside a footpath, patio or entrance, uncontrolled water exiting through the face may create a messy or slippery area. The best approach depends on the wall material, location and surrounding levels.
Surface water should be kept away first
The best water is the water that never reaches the back of the wall. Before relying on underground drainage, look at how rainwater moves across the property.
Garden beds should not slope towards the wall from above. Where practical, shape the ground so surface water falls away, or intercept it with a shallow swale, channel drain or other suitable feature. Downpipes should discharge into a proper drainage solution, not empty into a garden bed directly behind the wall.
Irrigation also deserves attention. Drippers and sprinklers placed too close to a wall can keep the soil wet for long periods, particularly in sheltered areas that do not dry quickly. Adjusting the layout or watering schedule may be enough to prevent a recurring problem.
The wall design changes the drainage approach
Timber, concrete block, stone and segmental retaining walls all need drainage, but their construction differs. Timber walls rely heavily on sound posts, correct footing depth and drainage behind the boards. Segmental block systems often have manufacturer requirements for aggregate, reinforcement and geogrid on taller walls. Concrete and masonry walls may use weep holes as part of their drainage plan.
Wall height is a major factor. A low landscape edge may be a manageable garden project when correctly planned. A wall retaining a significant amount of soil, supporting a driveway, sitting near a boundary or affecting a structure is a different level of work. It may need a consent, an engineer’s design or both.
It also depends on the ground. Sandy soil drains differently from compacted clay. A site with natural springs, poor falls or a high water table may need a more tailored drainage solution. Looking at the site before excavation is far more reliable than applying the same detail to every wall.
Common drainage mistakes that shorten a wall’s life
The most common problem is backfilling the entire wall with the soil dug from the trench. This may be convenient, but it often puts dense, water-holding material directly where drainage is needed most.
Another mistake is installing ag pipe with no fall, no outlet or no gravel surrounding it. The pipe then becomes a place for water and silt to sit instead of a route for drainage. Crushing or bending the pipe during backfill can cause the same result.
Poor compaction creates a different issue. Backfill should be placed and compacted in controlled layers so the ground behind the wall remains stable. Over-compacting too close to a wall with heavy machinery, however, can shift or damage the structure. The right method depends on the wall system and the access available.
Finally, do not cover drainage outlets with mulch, soil, paving or garden features. If water cannot leave the system, the rest of the drainage detail has limited value.
Signs an existing wall needs attention
A little moisture after rain is normal. Persistent symptoms are not. Watch for a wall that is visibly leaning, bulging, cracking or separating at joints. Soft ground at the base, erosion, stains, water running across paved areas and repeated puddles behind the wall are also worth investigating.
Avoid simply filling cracks or adding more soil to hide the problem. If drainage has failed, cosmetic repairs will not remove the pressure causing the movement. In some cases, the wall may need drainage improvements; in others, it may need partial rebuilding or a full replacement.
A practical site assessment can identify whether the issue is surface runoff, blocked drainage, unsuitable backfill, failed outlets or a wall that was not designed for the load it carries. Kandu Gardens can help property owners plan outdoor works with drainage, access and long-term use considered from the start.
A retaining wall should leave your property flatter, safer and easier to enjoy, not create a hidden water problem behind the garden. Building the drainage properly at the beginning gives the wall its best chance of staying straight and looking tidy through years of wet weather.